Crafting Wires

2016年2月28日星期日

Making Handmade Quilling Paper Flower Brooch

Hello, dear readers! Happy to see you again~ Here I will bring you handmade flower jewelry – quilling brooch. I think you will like it while read my detailed tutorial. Then, follow me to have a look.

Jewelry making supplies in making the flower brooches:
31x45mm iron brooch cabochon settings
5mm quilling paper
12mm red round jade beads
felt
scissors
white glue
ruler
sewing needle
Step 1: Wrap several circles with beige and pink quilling papers round the ruler and glue the end firmly as pictured.

Step 2: Repeat above steps to make other 7 patterns like the first one with beige and pink quilling papers. Cut a small piece of round shape with pink felt, glue it on the brooch cabochon setting and glue the quilling paper patterns on the brooch as a flower.

Step 3: Roll several times with white quilling paper, and roll several times around the white circle with purple quilling paper, then glue the circle quilling pattern on the center of the flower, and then stick a red jade bead on the circle quilling pattern as pictured.

Done~

Now, the handmade flower brooch is finished. How do you think of it? Anyway, this quilling paper jewelry is so easy to make, so you can own such a quilling brooch right now. Just try! If you have any problems or ideas, pls fell free to tell me. Hope you have a nice day!

2016年2月25日星期四

How Do I Attach a Cabochon to a Cabochon Setting?

Jewelry making that involves in cabochons is a tough job. This becomes a problem for the people who have never worked with a cabochon before. The designers find it very challenging working with them as attaching one to its setting requires a lot of care, attention and trouble too. But this can be a bit easy when you know what to do and how do it. Some handy tips could be very useful when you need to attach a cabochon to its setting. Doesn’t matter what kind of base it is or what design it has, when you know how to attach it things become easy to handle.
In order to work with the cabochons easily you need to know about some valuable tips so that you can fit it in the setting without any fuss or time consuming way:

A cabochon always has a flat back
It is important for you to check that your cabochon has got a flat back. You might find some of them that have curved backs which is due to the defect in the manufacturing. You need to be sure that the ones you buy have got flat backs otherwise fitting them in the setting would be a problem. This is especially to be considered when you are about to buy vintage ones.
Match the size with the base of the setting
Whenever I want to buy cabochon packs I make sure every size I buy easily fit on the setting. It is important for you to match the size and the base of the setting so that the cabochon stays in easily and effortlessly. Therefore, you need to see the shape of the cabochon carefully.
Use a legit adhesive
Whatever adhesive or glue you use should be an E-6000. Do not use a hot glue or a super glue. Using these products as your adhesive will let the cabochon out of its shell. It doesn’t stay for long. Using an E-6000 will provide a long time stay to the cabochon in the setting. It is quite affordable and durable as well.
Cleaning the cabochon and its setting
Just when you think that lets put all this together and see what a magical jewelry item it becomes, you need to be sure everything is neat and clean. No dirt is allowed when you are making jewelry. Clean the cabochon carefully and the setting as well. Never neglect the setting as it is the main thing that has got the dirt particles hidden. Clean it first with a piece of cloth and then place the cabochon.
While applying the adhesive
Dealing with cabochons and the settings can be easy when you know what you have to do. After you have cleaned the setting then its time you place the cabochon. Never apply the adhesive on the setting. Always apply it on the cabochon and then press it against the base of the setting. While doing this you need to make sure that the cabochon is touching the base of the setting evenly.

Give it enough time to dry so that everything is in place. These tips can be quite helpful for you while dealing with cabochons

2016年2月22日星期一

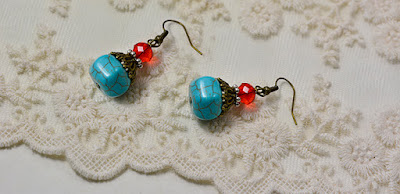
DIY a Pair of Easy Turquoise Beading Drop Earrings

Hello, dear readers! Wanna making turquoise jewelry? Here I will share an easy pair of turquoise bead earrings with you guys. This pair of beading earrings is so easy to make that you all can DIY a pair yourself quickly at home. Hope you like them. Then, let’s see.
Jewelry making supplies you will need in making the beaded drop earrings:
8mm Red Faceted Glass Bead
Bronze Earring Hooks
16mm Turquoise Square Beads
Tibetan Style Bead Caps
Brass Bronze Headpins
Brass Silver Flat Spacers
Round Nose Plier
Step 1: Thread a 16mm turquoise bead, a Tibetan style bead cap, a brass silver flat spacer and an 8mm red faceted glass bead to a brass bronze headpin in sequence as pictured.
Step 2: Make a small loop on the other end of the headpin, and attach this beaded drop to a bronze earring hook.

Step 3: Repeat above steps to make the other one earring.
Here is the final look of the turquoise bead earrings. Love them?
I know many of you are interested in jewelry making, but you may feel a little difficult in DIY. Then I hope today’s tutorial on making turquoise jewelry can give you some encouragement and inspiration in jewelry making. Also, you can change the turquoise beads into jade beads or pearl beads. Anyway, this pair of beading earrings is so easy to make, why not have a try?

2016年2月18日星期四

How to make a necklace using simple seed beads?

I resonate well with your knack for pretty materials and simple designs. I usually prefer sticking to it even if you always seem to be disappointed heading to stores and not being able to find goods in accordance with your scale of preference. As for that particular reason, I present you with a tutorial of step-to-step guide for hand crafting a seed beads necklace.
So, let us begin now and make sure you have the following tools ready to work with:
·         Seed beads
·         Monofilament wire (looks like fishing wire)
·         Jump rings*
·         Crimp beads – 1.8mm
·         Lobster claw clasp – 1x
·         Chain
·         Jewelry spacers
·         Scissors or wire cutters
·         Needle-nose pliers
 

I will recommend that you use assorted colors of seed beads. *Be careful about the size and quantity: 6 rings in 3 sizes – 4mm (1x), 6mm (3x) and 8mm (2x).
Step 1: Start making your necklace by cutting your filament wire about the length of 24 inches. Afterwards, put your crimp bead and your jump ring of larger size on one end of your wire. You must leave of 2 inches extra space on one end.
Step 2: Now take the end that is free of your wire and loop it onto the jump ring and then into the crimp bead to keep it securely intact.
Step 3: Now please make sure the crimp bead is pulled the entire way up to the border of the jump ring, so that it is secure. Then, using your pliers, simply compress the bead to keep it securely in one place. Now that your string is safe and secure, start sliding seed beads. Take your scissors and cut off the extra wire length. Please know that you will be practicing this step again and again.
Step 4: String your seed beads in any pattern you prefer. I would recommend you string all seed beads of a single color on a single strand.
Step 5: Once you are done, finish off by fixing a crimp bead to a jump ring exactly as you did in the initial step. Then, close the crimp bead. Now you’ll have two end points of jump rings in position and will only be attaching your seed beads to these from here.
Step 6: Repeat the stringing step again and again with any pattern or color. I added a few of jewelry spacers all-through to add some interesting impulse to the necklace.
Step 7: It’s time to finish off. Carefully, snoop open your 6mm jump ring using needle-nose pliers and add the jump ring to your chain about 8 inches. Then, attach that to your bigger jump ring and smoothly close it.
Step 8: Grab your wire cutters or scissors and make a half of your chain, repeating the same step on the opposite side. If you add extra length then you’ll have the liberty to shorter or lengthen your necklace as required. Secure your lobster claw clasp to your chain, fix it to the smallest ring and attach that to the ending point of your chain. Now take another 6mm jump ring and fix it to the opposite side of your chain to make a clasp.

Making a seed beads necklace was that simple!

2016年2月13日星期六

DIY Purple Bead Earrings with Seed Beads and Pearl Beads

Do you love purple? Purple always seems quite romantic and attractive, and today, you will be amazing for I combine romantic purple seed beads and elegant white pearl beads on a pair of leaves earrings. I can bet you will love this pair of beading earrings. Now, let’s see HOW together!
Jewelry making supplies you will need in making the purple bead earrings:
5x3.5x3mm blue superduo 2-hole seed beads
4mm white pearl beads
golden earring hooks
0.3mm tiger wire
Scissors

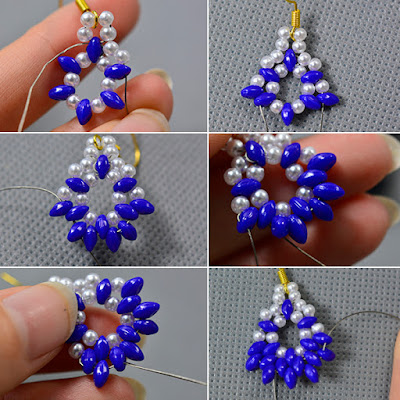
Step 1: Snick off a piece of tiger tail, thread an earring hook on it, and thread 4 white pearl beads and a purple seed bead on the wire as pictured. Thread tiger wire through the seed bead, tighten up and thread one wire through the lower hole of the seed bead.
Step 2: Add 6 white pearl beads and 5 purple seed beads on one wire as pictured, thread the wire with beads through the upper seed bead, and cross it through the upper hole as pictured.

Step 3: Thread 2 white pearl beads on the right wire, cross it through the next seed bead, and then add a pearl bead and a purple seed bead on this wire, cross it through the next seed bead. Thread 2 seed beads on this wire, cross it through the next seed bead. Repeat above steps to make another side of the bead drop.
Step 4: Thread a pearl bead on the left wire, cross it through the next seed bead, then continue add a seed bead on the left wire, cross it through the next seed bead, then repeat above steps to add other 3 seed beads on the wire and cross it through the seed beads as pictured.

Step 5: cross the wire on the right side through the next seed bead as shown, thread a seed bead on this wire, cross it through the next seed bead, repeat above steps to add 3 seed beads along as pictured.
Step 6: cross the wire on the left side back through the next bead, add 4 seed beads on it, repeat above steps to add other 3 seed beads on the wire till a leaf shape formed as shown in the picture.
Done!

Hey, so cute a pair of seed beads earrings, yes? I love this pair of pearl beads earrings so much, and you? If you also love the leaves earrings, why not try to make yourself? Hope you have a nice DIY journey and have a nice day~

2016年2月11日星期四

Style Up Your Jewelry with Glass Cabochons

Cabochons are the one-of-a-kind decoration items that are rounded from one side and flattened from the other. The flattened side is usually placed on the cabochon setting and glued there. You can use any sort of glue for fixing them on the cabochon setting. This type of decoration and jewelry items have been on from years and people admire it for the creativity and uniqueness it brings along. Amazing visual effects have been created with this kind of semi-precious stone. These are used in a lot of different projects apart from the jewelry projects.

When it comes to making jewelry with these, they are the best choice for making pendants. If you want to choose the types from their wide range then going for glass cabochons would be the perfect choice. These are one of the most beautiful types of semi-precious stones to work with. Anything made from glass is beautiful and so are they. Using any shade of a glass cabochon can light up the entire look of any ring, pendant, bracelet or necklace you want to make. Here are the reasons why a glass cabochon is the right choice for your jewelry making project:
The contemporary look
Anybody can buy the acrylic pieces which sparkle to enhance the look of the jewelry item. But cabochons hold a special significance that make them stand out in the crowd and give a luxury feel to the jewelry item they are placed on. They are often mistaken for semi-precious gemstones. However, they have got different price ranges coming along with them. If you want a gemstone like pendant but without spending excess money then having a cabochon pendant is the most appropriate choice. The cabochon is glued on a silver backing piece that folds in the stone. In this way, you can create a contemporary style pendant without having to spend a fortune on it.
Rich in colors
Cabochons have got amazing shades of colors that make any kind of jewelry item look incredible. The reason of its luxuriousness is why women prefer it in their jewelry. The cabochon pendants are the most famous jewelry item preferred by women. They are available in various attractive colors you can choose from. The glass cabochon pendants are great to make and possess.
Versatility
These glass stone type pieces are just beyond incredible and the perfect fit for any kind of jewelry item. Not only the jewelry items but these can be used in different items such as on trophies, boxes, wedding favors, furniture, pendants, invitations, plaques, books and much more. Along with this, cabochons are available in different sizes too. You can even place more than one glass piece cabochon on each item.
Durability
Another reason why people prefer these glass pieces is that they are durable as compared to the other glass, stones or beads. Due to the shape they possess they can take in more force than other kinds of glass pieces. They are less likely to break or crack. Glass cabochons can be easily placed inside their settings.

All these reasons make the use of a cabochon best for any kind of project. Make sure you are using them right. 

2016年2月8日星期一

How To Make A Hemp Necklace Using Simple Jewelry Making Supplies?

You can present someone with a hemp necklace that you would make out of your own hands. Just imagine how tendered they would feel because you took the time and goodwill of making a beautiful necklace with simple jewelry making supplies.
But before commencing, make sure you have check listed the following mandatory jewelry making supplies:
·         Hemp: Here, we’ll use hemp 12 times the length of the measurements. If your neck is 16 inches then you will need 16 feet of hemp.
·         Safety pin
·         Scissors
     Step 1: Measure how much of hemp you require. Wrap the end of a strand around your neck. Cut the strand where it parts with the corresponding side of your neck. In order to attain a good measure, add a few extra inches while cutting the strand. Now repeat the same round of wrapping to get two strands that form a loop in between. This is your foundational strand and also where you’ll be tying the hemp knots around.

Step 2: Pull the newly cut strand steadily and measure one more length of hemp right next to it; do not cut the new strand, though. You will be committing the doubling round of strand over and over again until you reach 8 doubled strands. Afterwards, you need to have one long piece of hemp when you pull the strand, so cut the hemp by the end.
Step 3: Now comes the part where you have to knot. I will prefer you have a spare table or some sturdy surface besides your collected jewelry making supplies. You can secure the initial loop using a safety pin. It can generally set your hands free for doing other steps and save time.
Step 4: You have to create a loop that shall be a part of your necklace’s clasp, so fold the foundational strand in half. Followed by, fold the long strand in half and wrap its loop around your foundational strand’s loop.
Step 5: Now be very careful as you cross the left-side piece of the long strand over the foundational strand, and then underneath the right-side piece of the long strand.  You’ll reach the point where the left-side stand would lie under the right-side strand. You have to wrap the right-side stand behind the foundational strand. The right-side strand that is behind the foundational strand, pull it through the left-side’s loop. Grab both strands. They should be on the opposite sides from where they started, and pull the knot up tightly. That’ll form a square knot.
Step 6: Push the first knot up the center of the foundational strand until its loop reaches a size for fitting an ending knot through. The last knot will perhaps be the size of your fifth finger or even smaller than that. To estimate the size of loop required, tie a temporary knot using the end of the strands.
Step 7: Now the following steps are repetitions. Start with crossing the right-side strand back over the foundational strand. Enclose the left-side strand over the crossed right-side one, then behind the foundational strand. Then pull the left-side strand through the right-side one’s loop. You have to make another square knot by pulling the strands tightly.

Until you reach your desired length, repeat this process. Now tie all four strands into a regular knot that will be pulled all the way through the foundational loop to work as a clasp for your necklace.

That’s it; your jewelry making supplies came worth your money!