Crafting Wires

2016年1月26日星期二

DIY Beading Bracelet with Purple Seed Beads and White Pearl Beads

Hey, my friend! Love beaded tassel bracelet? In today’s tutorial, I will share a blue beads bracelet with you all. I think you will love this bracelet. So let’s go for a look.

Supplies you will need in making the seed beaded bracelet:
3mm Purple Glass Seed Beads
8mm White Glass Pearl Beads
Antique Gold Heart Toggle Clasp 
0.3mm Jewelry Wire
Scissors
Step 1: Cut a piece of jewelry wire (with a length about 60cm), slide a toggle clasp on it, and then slide 4 3mm purple seed beads on the 2 wire respectively. Thread another seed bead and cross the wire from it as pictured.
Step 2: Slide one wire 6 seed beads and cross this wire from the 5th bead then add other 3 seed beads to the wire. Cross this wire from the first seed beads as pictured.
Step 3: Thread 8 seed beads on the same wire, cross this wire from the 7th bead and then add 3 seed beads on the wire. Cross the wire from the 3th seed bead and tighten up, then the bead pattern just like tassel. Repeat above steps to make other more tassels like the first one.
Step 4: Slide 3 seed beads, a 12mm white pearl bead and 3 seed beads to another wire, and then cross the 2 wires through a seed bead as pictured and tighten.
Step 5: Slide 6 seed beads on one wire, and then cross the wire through the 5th seed bead, then add 3 seed beads on the wire. Repeat this step to make 3 more tassels as pictured.
Step 6: Slide 3 seed beads, a 12mm white pearl bead and 3 seed beads to another wire, cross the 2 wires through a seed bead as pictured and tighten up.
Step 7: Make enough tassels till you’ve make a suitable length. Slide 4 seed beads to the 2 wires respectively, and then cross the 2 wire through another seed bead and tighten up. Add a toggle clasp on one wire and tie it with the bracelet firmly and then slide the excessive wires through along the beads.
Done!
Now, the pearl beads bracelet is finished yet. Fall in love with it? Just try to make this seed beaded bracelet yourself! Have fun~ 


Do You Really Think You Know About Lava Beads?

Did you ever heard about the lava beads? If yes then are you sure you know all about them? These beads are one of the beads that are widely sold in the market. These are popular for making fashion jewelry beads and their types are increasing rapidly. The look of these beads is a bit earthy along with elegant. They have charm of their own. But when it comes to buying these beads for making jewelry then you need to know about some facts which even I didn’t now but with research and struggle this is what I found about these beads:
1.       By the name we can surely guess that they formed with the help of lava which is the one that is produced through the volcanos. But actually they are made from basalt that is a sort of igneous rock that forms during the volcanic eruption.
2.       Under the surface of the rising volcano, the pressure and temperature are in such a state that they are able to melt rock. This is why whenever the volcano erupts the lava brings molten rock as well. But as soon as the environment cools down everything that came out of the volcano then solidify. As a result of this, the stone beads are made. Usually, these lava beads are found in the shapes of ovals, discs, teardrops, slices, roundels and saucers as well.

3.       These stones have a porous nature which clearly means that they have got holes and bubbles in them making them light in weight as well. This makes them ideal for using in jewelry. Lava beads enhance the look of the jewelry items making them a lot more attractive and comfortable to wear as well than the usual beads.

1.     
The natural looking beads of lava come in brown, grey and black color. These beads can be dyed as well which is why you will find them in variety of colors in the market. Due to being porous, they have a rough texture. Thus, before selling out in the market or for using in jewelry they are smoothened out with paraffin wax.
2.       Because of the physical properties of the lava beads they hold a significance importance in the fashion and crafting industry. Lava stone is considered as the symbol of fertility, strength and endurance. People believe that this stone brings stability in crucial times. As it is extracted from Earth thus it holds in strength that hold our relationship with the planet firmly. Other characteristics of this stone are that it reduces anger, firms our belief and provides help and support in making the right choices. This is the reason why American Indians used to wear this before battles.
3.       If you are looking forward to buying these beads then you need to watch out for the fake manmade ones. The fake ones are even lighter than the original ones.
The ideas you can use the lava beads with are numerous. You can create different and valuable items with the help of these beads. If you want to buy these in bulk then choosing wholesale options would be wise. 

2016年1月21日星期四

Do Wholesale Beads Really Save Money?

A lot of people have started making jewelry on their own. Some people do it just for fun and as their hobby while others make some serious money out of it. This business is growing out in the industry massively and people are depending on it for their income. Jewelry making is an art. You can’t just display the same old design with changes of color and expect people to buy the same thing for months. People require change and spontaneity in their lives and require creative jewelry items to wear that describe their personality. To know if money is saved on wholesale beads then let us find out.

Every person who is familiar with making jewelry knows that wholesale beads are the ones to go for when it comes to saving money. But do you really think that it is all about the money? If yes then you are probably wrong. Wholesale supplies are recommended as they provide some compensation. The amount of money spent on the jewelry supplies can use more than half of your budget. I have seen people buying jewelry supplies without considering their quality and they just roll just like that. The real meaning of wholesale supply usage in jewelry making has been forgotten. Getting quality beads at less rate is what the jewelry makers provide.
Decreased per unit cost
This is a general concept that wholesale purchase reduces per unit cost which makes it quite affordable to buy the beads or any sort of jewelry supplies in bulk. The more you buy per unit cost reduces accordingly. The cost per unit depends on the amount of wholesale beads you buy.
Split the purchase
If you think that you won’t need thousand beads yet you need to buy at cheaper rates then you need to find someone to split the purchase with you. You can add in as many friends as you like to share the crafting supplies and can make large orders too. This will also save your money in buying beads at wholesale.
Shipping price
Apart from the money saved by purchasing the wholesale beads, you also need to check the shipping charges if you are buying it from an online store. The amount of shipping included will raise the amount you have to pay per bead. The increased shipping costs of the wholesale beads make the purchase cost more than you expected and no bargaining can reduce this one. The suppliers also offer free shipping to the customers who buy beads in a huge quantity.
Online purchases
The benefit of online purchases is that you don’t have to travel a long distance to get the right beads. The amount of time you spend to go there and the money spend on the gas can be a lot when you sit down and sum it all up. Save your time and money and buy on wholesale online.

So far, this is how I see money saved up by going for wholesale beads. You will definitely benefit from this in every possible way. 

2016年1月17日星期日

Making an Easy Handmade Beaded Chain Necklace

Do you love beaded chain necklace? Today, I will show you an easy handmade necklace tutorial, and you can also make one at home. Then follow me to have a look.

Jewelry making supplies you will need in making the pearl beaded necklace:
10mm Blue Glass Bead
12x8mm Blue Faceted Drop Bead
Headpins
Eye pins 
Jump Rings
8x6x1mm Silver Chain
Lobster Clasp
Round Nose Plier
Needle Nose Plier
Diagonal Plier


Step 1: Thread an 8mm pearl bead to an eye pin and make a loop at the other end of the eye pin. Repeat this step to make more such patterns. Thread a 10mm blue glass bead to an eye pin, make a loop on the other end and repeat to make more such patterns.
Step 2: Connect a pearl bead pattern with a glass bead pattern, repeat this step to make another such pattern, link these 2 patterns with a jump ring, and add an 8mm pearl bead pattern on the two sides as pictured. 
Step 3: Snick off 2 pieces of chains (with a length about 16cm), link them to the beads pattern as pictured. Attach a pearl bead and a glass bead pattern on the two sides of the beaded pattern as pictured.
Step 4: Link 4 glass bead pattern together and connect them with the jump ring as shown in the picture, add a jump ring on this glass bead pattern and link a pearl bead and a blue faceted drop bead pattern on the below.
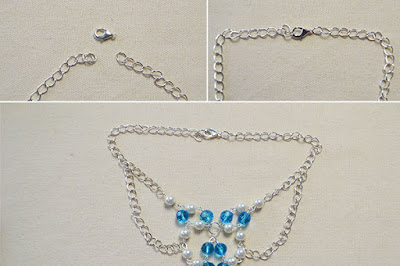
Step 5: Add 3 pearl bead patterns on both 2 sides of beaded drop. Snick off 2 pieces short chain (with a length about 10cm), connect these 2 short chains on both sides of the silver bead chain necklace as pictured.


Step 6: Connect the necklace with a lobster clasp.
Done!
Now, this DIY chain necklace is finished. With blue glass beads and white peal beads, this beaded chain necklace becomes more attractive, right? If you also love the silver bead chain necklace, just try to make one for yourself.


2016年1月14日星期四

How To Make Lava Beads Jewelry?

Girls like us who are into home-crafted jewelry are profoundly fervent for lava beads. If you are hearing it for the first time, let me tell you what lava-beads are and how you can use them to create exceptional pieces of jewelry. Most popular of these pieces are bracelets, and in this post you will find every single bit of information on how to create a few batches. It is a wonderful way of making a few bucks provided that people around you are fond of trying new things.

Before we start on the process of making lava bead jewelry, here’s what you need to know about the look and feel of lava beads. It is formed by the natural molten lava and is crafted into various shapes to suit individual requirements. It has become a trend to wear lava bead jewelry for various reasons. For now we are all about its significance in fashion!

a.      Things you need to make a lava bead bracelet

Lava beads look breathtaking on their own but I prefer adding some color to the grim and sultry look of these beautiful stones. Therefore, I am going to give you a list of essentials that have add-ons to make your jewelry look glamorous.
-          Lava beads strand: usually a 15” of strand is perfect to make a few pairs. You can easily buy them online or if you are planning to make a number of batches for sale, wholesale prices would benefit you more.
-          Colorful acrylic beads: Any color of acrylic bead would look great as long as you like it. Think of various combinations, mix and match with your favorites and you are on a roll.
-          Nylon thread: Lava bead strand will only hold the beads. It will not be used to make the bracelet, so opt for good quality neutral shade nylon thread that does not hurt delicate skins.
-          A Pair of scissors &Lighter: to cut threads and seal those ends.


b.      Step by step guide on creating a lava bead bracelet
I would advise all first timers to perform this task in a comfortable environment, so you can enjoy at the same time and find your true calling in home-crafted jewelry.
a.       Cut a pair of threads of same length, let’s say 40cm each and tie an overhand knot.
b.       Now insert both ends of the thread into a lava bead, facing each other oppositely.
c.       Now you have two faces of threads in opposite directions. Add on your favorite combination of acrylic beads and make the threads pass through another lava bead.
d.       Continue to do so until you have reached a desired length and seal the row of beads with an overhand knot once again. By the looks of it, you’re almost there!
e.       Take another thread of 20cm length and place it with remaining ends to create square knots. Make at least seven square knots or as many as you can manage.
f.        Make the ends of both threads prettier by adding acrylic beads on both ends and tie double overhand knots.
g.       Cut the long threads and burn their ends with lighter to make a seal. You’re ready to sport your first lava bead bracelet!


To make many more bracelets made of lava beads like these, you will have to bring yourself into practice of tying overhand and square knots, if you are not generally good at that task. Once mastered, your bracelet making game will go sky-rocketing. 

2016年1月13日星期三

DIY Chain Necklaces with Quilling Flowers for Girls

Good afternoon, friends. Today, I will show an easy beading necklace with you. If you are searching for quilling paper necklaces, then I hope you can get some inspirations from my tutorial on DIY chain necklaces with quilling flowers for girls. Now, follow me to have a look!

Jewelry making supplies you will need:
3mm quilling paper
5mm quilling paper
6x3mm white acrylic pearl cabochons
8mm white glass pearl beads
brass jump rings
headpins
lobster claw clasp
iron cross chain
scissors
glue gun
tweezers
white glue
needle nose pliers
round nose pliers
Step 1: Roll several 10cm yellow quilling paper circular beads as pictured, and pinch them a little into an oval shape. Take 5 circular beads and stick them together as a flower, then glue a white acrylic pearl cabochon in the center of the flower.
Step 2: Repeat above steps to make other 3 quilling flowers with pearl cabochon, add a jump ring to each ready quilling flower separately, and connect the 4 flowers with the cross chain as shown in the picture. Slide 5 pearl beads to 3 head pins separately, make a loop on the bottom and attach the 5 head pins to the cross chain as pictured.

Step 3: Add a jump ring to both ends of the chain, attach a lobster claw clasp to one end of the jump ring and one part of the chain as pictured, and add another pearl bead with head pin to the other end of the chain.

Here is the final look of this DIY flower necklace.
Now, this easy necklace is finished. What a wonderful chain necklace for girls! How do you think of this quilling paper necklace, and do you love it? Just have a try!


2016年1月7日星期四

Glass Beads: A World unto their Own

If you have ever even remotely considered the possibility of designing your own jewellery, you probably know what glass beads are. And unlike most others who view it merely as beautiful, you know the kind of creativity they represent in terms of their correct usage. Also, they are extremely inexpensive. However, if you are like me who likes to get everything down just right and like making your own beads, you are in luck. We will be covering the basics on how to make them and then outline a few more creative ideas.
First comes safety
While the prospect of making your own glass beads might be extremely exciting, you need to understand that creating your own beads is not exactly a walk in the park. So the most important thing here is safety. You will be working with a propane torch, so make sure that you are not wearing anything flammable while working. Also, be sure to have gloves ready, preferably of flame resistant material so that you can handle the extremely high temperature materials you will be working with. Always be sure to work in a brightly lit environment. Get a safety glass. Always have a fire extinguisher nearby in case of emergencies. And last but not the least; do not heat the glass too high. Super-heated glass is not to be trifled with.
Making it
Now that we have the safety points taken care of, let us get down to business.
·         For the glass, you will need, well, glass. So get all the junk you have left over. Broken glass pieces, waste milk bottles and any kind of clean glass is totally usable.
·         Get some thin metal rods (old un-rusted cycle spokes work the best)
·         Heat the glass pieces, holding them at an angle so that the glass can liquefy easily and can be collected somewhere
·         Coat the rod with molten glass
·         Heat the rod uniformly so that the beads become smooth and round
·         Finally, let it cool in the air
Under no circumstances, should you touch it while it is cooling. Also, initially, start with small glass beads. Larger ones crack easily and should only be attempted once you have sufficient experience in handling them. Later on, you can add colour to the beads when they are cooling. This gives a nice hue to the beads once set. 
Versatility
Glass beds are one of the most overlooked, and yet highly used materials in making jewellery. Not only can you make them in different sizes, once you have mastered the art, you can use molds for making different shaped ones as well. While it is true that home-made molds cannot be used for anything too intricate, same fairly interesting ones can always be prepared. And if you get too bored, you always have the option of buying them. From skull shaped glass beads for Halloween to Christmas tree shaped ones for the festive season, the possibilities are endless. And you can virtually use them as almost anything; from a pendant to ear rings.

So get down and get creative.

2016年1月4日星期一

DIY Quilling Paper Flower Earrings

Hello, my friends, do you love paper quilling earrings? They are often unique and delicate, and I have made some for myself. Today, I will show you a pair of paper quilling flower earrings. This pair of green flower earrings is very easy to make and I just finish them within 15minutes. Hope you love them and make ones for yourself.

Jewelry making supplies you will need:
Red Pearl Beads
Green Quilling Paper
Red Quilling Paper
Earring MakingSupplies
Gold Jump Rings
Paper Models
Scissors
Roll Pen
Long Nose Plier
Glue

Step 1: Cut a piece of green quilling paper (with a length about 10cm), and roll it into a circular bead, put it into a 10cm hole as pictured. Stick the end and pinch it into a petal-like shape as pictured.
Step 2: Repeat step 1 to make other 8 petal-like shapes, and stick them together as a flower.

Step 3: Glue 3 red pearl beads on the surface of the green flower as shown in the picture. Roll another small quilling paper circular bead and stick it with the flower as pictured, then attach the earring making supplies to the flower with a jump ring.

Step 4: Repeat above steps to make another one earring.
Now, I have finished this pair of flower earrings. So beautiful, do you love them? With wholesale jewelry supplies that you can find on Pandahall, you can also make this pair of handmade paper quilling earrings. I will make more pretty quilling paper ornaments, expected? See you next time~