Crafting Wires

2015年12月30日星期三

DIY a Pair of Red Beaded Dangling Earrings

Hello, guys. How do you think red beads jewelry? I love red very much, for this color symbolizes romance and passion. Today, I will share you a tutorial on making a pair of beaded dangling earrings. This pair of handmade beads earrings can not only shows your personality, but also your passion.


Jewelry making supplies needed in making the red beaded earrings:
Hoop Earrings
Jump Rings
Dark Red Glass Beads
Earring Hooks
Jewelry Wire
Round Nose Plier
Flat Nose Plier
Scissor


Step 1: Slide enough red glass beads to 3 hoop earrings respectively as shown in the picture.


Step 2: Connect the 3 hoop earrings with 2 jump rings. Snick off a long piece of jewelry wire, wrap it with an earring hook as pictured, then slide enough red glass beads to it. Attach 2 jump rings to 2 ends of the wire and connect the beaded earring hoops with the wire together.


Tada!


Repeat above steps to make the other one earring. Now, this pair of beaded dangling earrings is finished, how do you think of them? The beads earrings design easily, but they are elegant and shining at the same time, right? I think you will love this pair of handmade beads earrings as well. Why not try to make such kind of red beaded earrings by yourself? Have fun and have a nice day~

2015年12月22日星期二

How to Make Snap Jewelry with Snap Set Findings?

Are you one of those jewelry makers who do not like to use gem settings to create any jewelry item? Do you want to make gem jewelry without any metal work involving? If yes, then I am going to teach you how to start things and eventually end up with the right kind of jewelry. To create your snap jewelry you need to find the right kind of snap set findings first. You can choose from the several options available and pick the one that suits you the best. There are different types of mountings that are used to pendants, earrings and rings as well.

When you find the right snap set finding then the next thing comes is to place the gem on the finding. You can either choose to put the gem on a plain surface and press the finding from behind or you can place the finding on the surface and press the gem on to it. You can decide which ever method is easy for you do to. I personally like to place the gem on the surface and then press on the finding. The finding will snap right onto the gem then you can complete the look of your snap jewelry but placing as many gems as you like.
Some tips to guide you through
While making the snap jewelry and the use of snap findings in it you need to make sure you are doing everything in the right manner. If you somehow use the wrong approach then you might be struggling on it for a long time.
So, I have some tips and suggestions for you here that can prove to be beneficial in making your snap jewelry in the best way possible:
·         Using faceted gems are easier to handle as compared to the cabochons when it comes to the beginners. This is because the faceted gems have got a flat table while the cabochons are rounded.
·         To keep the gem in place while you press the finding on the back you can use a double sided tape or you can tape the ends of a scotch tape to do that.
·         Rounded faceted gems are easier to use than the square or rectangular ones. Using the round faceted gem does not gets crooked which is why it is easy to use.
·         Try to place the gem on some old surface or on a wooden piece when you press the finding on it. Don’t place it on a newly polished surface or a good surface as the gem might scratch it.
·         While you place the snap set findings to complete your snap jewelry make sure you hold the earring post in one hand and then snap the gem in the finding with the other hand.
·         If you find some space between the gemstone and the mounting then you can add in some wire rings. I have made my crafts even more beautiful and attractive by using wire rings on them.

·         You also need to have the snap set finding of the size of the gem so that you can end up with neat jewelry items. 

2015年12月21日星期一

DIY Christmas Card with Quilling Paper Stocking

Hello, friends. As the Christmas Day is coming, I know you are preparing Christmas jewelries for it. Now, I will show you a merry Christmas card with quilling paper stocking. Let’s have a look.
Jewelry making supplies in making this Christmas card with quilling paper stocking:
1.5mm Red Quilling Paper
2.5mm Yellow 
quilling paper
3.5mm Green Quilling Paper
4.Plastic Paillette Star
5.Model
6.Rolling Pen
7.Scissors
8.Tweezers
9.Glue
Step 1: Making a red quilling paper stocking
Firstly, cut some pieces of 5mm quilling papers, with a length of 5cm, roll them into circular beads, and put them into the 8mm hole.
Secondly, stick all the circular beads on the quilling card in a stocking shape as pictured.


Step 2: Add a lot white quilling paper circular beads
Firstly, cut some pieces of white quilling papers, with a length of 5cm, roll them into circular beads.
Secondly, glue these white circular beads on the top of the red quilling paper beads as pictured.
Step 3: Make the final design of the card
Firstly, cut a piece of green quilling paper, with a length of 6cm, fold it in half and tick the 2 ends.
Secondly, glue the green quilling paper with the stocking as the picture show, and you can add other more ornaments on the card as you like.
The Christmas card with quilling paper stocking is made!

Now, I have finished this Christmas quilling card. Do you love it? I make this stocking Christmas card within a short time, for it is so easy. If you are interested it as well, just make a quilling paper greeting card by yourself. Just have a try!


2015年12月17日星期四

DIY Earrings with Aluminum Wire

Good afternoon dear friends, nice to see ya again. Do you have an interest in jewelry making? If yes, today I am going to share you an easy tutorial about how to make DIY earrings with aluminum wire, please follow me to see HOW!
Jewelry making supplies needed for how to make the easy DIY earrings with aluminum wire:
1.5mm red aluminum wire, 0.8mm black copper wire, earring hooks, round nose pliers, flat nose pliers, wire cutter.
Steps for making the cute DIY earrings with aluminum wire:
Step 1: prepare the wire wrap spiral pattern
First, trim off a length of 20cm aluminum wire;
Second, form a loop at one end using the round nose;
Third, prepare the spiral pattern with double round noses;
Fourth, form the last coil by winding around a marker;
Fifth, prepare a 2cm tail and trim off the unnecessary wire;
Sixth, make a loop on the tail;
Please see the picture showing below:
Step 2: finish the spiral earrings with aluminum wire:
First, wind the black copper wire around the round nose;
Second, cut off 4 jumprings;
Third, combine the spiral wire dangle with the earring hooks using double jumprings;
Fourth, repeat the same procedures to make the another one;
Here is the final look of the pretty DIY earrings for women:
Wow, guys, how do you feel like the DIY earrings with aluminum wire? It’s so adorable and easy to make right? If you wanna hold such a pair of earrings, why don’t you make it yourself? Good luck guys. Hope you like it and wish you a good day~

How to use the Wholesale Charms?

Who does not love charms? Some people think they are quite hard to handle because you have to use the jump rings pliers for this purpose. I say it does not have to be that hard, you do not need many tools for this expect for a few.
Many of us would like to maintain a collection of wholesale charms. I would agree with this because I have a whole collection of these charms. You can basically create everything with these hanging loops. So if you are interested in making a charm bracelet with a bunch of charms that you have, here are some things that you would need:
·         Jump rings
·         Charms
·         Needle nose pliers

How to put the charm together?
This is quite easy actually. The first thing to do is open the jump ring using the needle nose pliers. You can also use a tweezer along with it if you need help. Just open it crooked and add the charm inside. Don’t close the jump ring yet. You have to use the pliers for moving the jump ring over to the hoop of the bracelet. You have to be sure that the charm is facing the right way when you are losing the jump ring. Just press the ends together and will successfully add wholesale charms to your bracelet.
You will have to repeat the same process for adding the jump rings and charms on the bracelet. The charms can be of any size, you don’t really have to specific in terms of the size as long as you want to create your very own personal style statement.
It is easy, you don’t really have to an expert to make a charm bracelet or any other type of jewelry. There can be plenty of things that can be done with these beads, all you have to do is list down the ideas that you have in your head and you will love working with charms.
How to buy the right quality for charms?
In case you don’t have charms and you wish to buy them, then here are some of the tips that you must follow in order to buy them in the best quality.
·         You will come across lots of sellers of wholesale charms, but before buying any charm, make sure that you test the quality by holding. By holding the item, you will know what kind of quality it possesses and whether these charms are going to be good enough for creating the whole project for you.
·         Ask them to give you guarantee. When you will have guarantee on the product, then it means if something goes wrong, then you can easily return it.
·         Don’t buy a large quantity in the first go otherwise you will regret it. It would be in your best interest to test the quality first so that you are sure you have the bought the best thing.
·         Don’t always settle for price. Sometimes, you can find a low price and best quality wholesale charms package as well.

With the best wholesale charms at hand, different ideas will come to you on its own. 

2015年12月13日星期日

A Collection of Eye-Catching Earrings!

Good afternoon guys, as you know, earrings are indispensible for most of girls. So today I am going to share you some stunning earrings, which will not let you down! Please follow me to see together.
1.  Antique Bronze Dangle Earrings
What unique earrings they are! I love the kind of earrings so much! As you can see, its bronze earring hooks look pretty vintage and they are pretty elegant in my eyes. Besides, you can’t ignore the round pendants, the butterflies on which are so cute and vivid. Do you think so?
2. Natural Green Aventurine Tree Dangle Earrings
How do you feel like the pair of earrings? I love its nature green color sooo much! Because it’s fresh and make me feel cozy. In addition, its tree shape design attracts me a lot, it really unique. By the way, the cheapbeads used are very easy to find. If you wanna try, you can make it yourself~
3.  New Design 304 Stainless Steel Dangle Earrings
Stunning! Its double hoops design must be adored by most stylish girls I guess, which is so fabulous~ moreover, the blue glass beads are a shining point in the jewelry design. Blue color bears a mysterious veil and can match most of clothes~
4. Star Natural Agate Dangle Earrings
Wow, colorful and fantastic! Different colors matching together often make people feel happy, because various bright colors are easy create a festive and jolly atmosphere, so if you are in low spirits, try the style jewelry, you must feel better I promise~

Hey guys, which one do you like best? Maybe it’s hard to say, because each pair of earrings looks so nice. Anyway, hope you like it and wish you a happy day.

2015年12月11日星期五

How to decorate your bedroom with glass beads?

To give an extra sparkling touch to your bedroom, you can give a thought to investing in some glass beads that are available in market at a cheap price. These beads can be used to give a makeover to the appearance of your bedroom and can change the whole allure of your room.
To give a unique look to your rooms, you can consider different home décor projects that use glass beads. You do not need to be an expert to try those projects, anyone can try simple things to decorate anything you want using the beads. Here I am going to share a few ideas that will help you in decorating your rooms with glass beads:

Relight the fire:
You can fill a surface glass bowl with smooth or faceted beads and place a tea-light candle in the center of that bowl. When you light the candle, the flame will produce an array of multi-colors by reflecting off of the glass beads. If you use colored beads, it will provide an even better color effects. Glass beads are inflammable and hence are safe to use with candle placement. Using this decoration piece in your bedroom will provide you with a romantic candlelight appearance. It is safer than using a candle holder for having a romantic candlelight look.
You can make Dream Catcher:
You can make your own dream catcher by using glass beads and some other additional jewelry supplies that you can pick from any craft store. You will need hoops that are flexible yet strong and some twine. There are many tutorials available online that can assist you in creating your own beautiful and unique dream catcher that you can use in your room. Those tutorials will be helpful for you if you want to add beads to its main structure. Once your main structure is completed using threading process, you will be able to proceed using extra colored beads in your dream catcher that will add the sparkle to your bedroom in the moonlight.
Decorate Mirror:
You can decorate a plain mirror frame by using a lot of different glass beads. There is a wide range of beads available in the market that you can use according to the general color scheme that matches your bedroom. You can use tiny seed beads to decorate a mirror and gloss them to protect from any damage or you can go for large sized beads to give your mirror an antique or chunky look. You can use glass beads in a combination with different charms to enhance the allure of your mirror. A total mismatch of different kinds of beads can also give a funky look to your mirror. You can try different arrangement techniques and then stick the beads down on the mirror in the best possible way.

Above mentioned are some ideas through which you can give an attractive look to your bedroom or any other room of your house. What you need are a creative mind and supplies.

2015年12月9日星期三

Some Fabulous Jewelry You Can’t Miss!

Happy Friday dear friends, how’s everything going? Today I am going to introduce you some fantastic jewelry which will not let you down I promise! Let’s start to see~
1. Adjustable Brass Rhinestone Glass Finger Rings
Hey guys, how do you think about the ring? I love its pattern so much, which looks so unique! We don’t often see rings that can be adjustable. To be honest, this is the first time I see such special and pretty ring~ so I must share it with you!
2. Unique Plastic Net Resin Rhinestone Tassel Pendant Necklace
Wow, fantastic! Tassel jewelry is pretty fashionable in recent years, i think this tassel pendant necklace must be adored by most stylish girls~ I love the glass beads used most. If you wear such a stunning necklace, you really stand out among crowds, believe it or not~
3. Valentine's Day Silver Tone Heart Brass Dangle Earrings
Hey guys, what occurs to you when seeing such a beautiful pair of earrings? Do you have an impulse to buy it for your girlfriend? It’s really good for you to select it as a gift on Valentine’s Day. Besides, the heart shape pendants are so cute and romantic. In addition, you also can’t ignore the pretty earringhooks, do you think so?

4. Women's Acrylic Triangle Pendant Necklace
I fell in love with it at first sight! Since its pattern looks so cool and special, especially its triangle pendant! I think triangle jewelry is very stylish. Did you see the colorful acrylic beads on the triangle pendant? Which are really cute, I love it soooo much!

Hey dear friends, which one impress you most? For me, I love the second one most. Certainly, different people hold different opinion about fashion. Anyway, hope you like today’s jewelry and wish you a nice day~

2015年12月6日星期日

Some Christmas Ornaments Worthy of Your Attention!


Good afternoon dear friends, as you know, Christmas is approaching. So do you have any ideas in your mind to decorate your home or yourself? Maybe your mind goes blank now. if so, I’d like to share you some Christmas ornaments, let’s see together~


1.  Fashion Brass Bell Bib Statement Necklace
This brass bell bib necklace with faux suede cord, iron chains and CCB spike beads looks pretty cool and personalized, right? Its colorful bells are so cute! Have you fell in love with it? if you wear such fabulous necklace on Christmas day, you must stand out among crowds~
2. Christmas Candy Cane with Bow
Candy cane is one of the traditional symbols of Christmas, and I love red-and-white candy cane most! Here red candy cane made of clay beads plus green bow is more adorable I think~ you can hang the candy cane on Christmas tree or windows, it’s up to you.
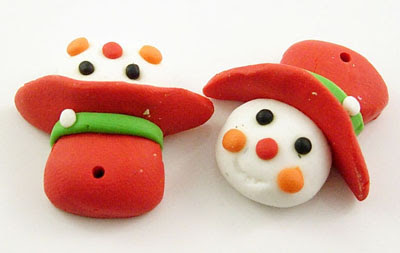
3. Handmade Christmas Snowman Hat with Polymer Clay Beads
Here is another kind of Christmasbeads I’d love to share with you. I was totally fascinated by the cute snowman beads, guys how do you think about it? It’s also made of polymer clay.
4. Painted Snowflake Acrylic Beads
Christmas in every year, we must see much snow, which makes me feel so good. If no snowflakes, there would be no Christmas atmosphere, do you think so? You can use the snowflakes decorate your Christmas tree and home, and it won’t be out of date on Christmas.

Among all the Christmas ornaments, which one do you like best? If you have any other good ideas, you can also share with me, I am waiting for you. Anyway, hope you like today’s Christmas ornaments shared~ and wish you a happy day~

2015年12月4日星期五

A Collection of Eye-Catching Beads!

Good afternoon dear friends, today I am going to introduce you a collection of stunning beads, which won’t let you down I promise, ok, let’s get down to business now~
1.  Agate Triangular Prism Bead Strands
Wow, fabulous! Clean and pure luster which makes me feel pretty cozy, really wanna have a touch on it. Besides, its column shape looks so unique, do you think so guys? In addition, I love its green color, because it is the symbol of vitality, which suits youngsters very much!
2. Faceted Glass Abacus Large Hole European Beads
How do you feel like the European beads? Pretty colorful and cute, right? And i have a special preference for transparent glass beads. The kind of glass beads is a good jewelry making supplies. It can be used for earrings, bracelets, necklaces eat. So it is adored by most of jewelry making designers or stylish girls.
3. Feather OX Bone Pendants
The feather OX bone pendants with platinum tone brass findings and polymer clay beads looks really cool and unique, especially the feather shape. If you wear such a pair earrings, you must stand out among crowds I promise! Just try it guys~
4.   Handmade Porcelain Round Beads Strands
What a bright and beautiful porcelain beads strand. If you love the beads strand, you can make it yourself and the beads are kind of cheap beads but pretty nice for jewelry making. Besides, if you have any confusion, you can search a tutorial to learn, good luck~

Hey guys, which one leaves the deepest impression in your mind? To be honest, I love the first one most! Anyway, hope you love today’s beads and wish you a happy day~

2015年12月3日星期四

How to make a Purse using Wholesale beads?

I have been crafting for several years and I love to do it. I have a large collection of different wholesale beads as I am addicted to different sorts of beads and buy them anywhere I find them. Recently, I saw a beautiful color of crystal beads in the craft store and got an amazing idea to convert those beads into a purse, so I bought those crystal beads to practically implement what I had in mind.
Here I am sharing my idea of the purse with you so that you can also make your own unique purse using any kind of wholesale beads.
Things you will need to make crystal beaded purse:
You will need plastic thread or fish wire, lining fabric that will be used in the same color as of the beads, needle and thread, sewing machine, crystal wholesale beads of any beautiful color of your choice and a zipper for the purse to close its opening securely.
Making beaded chains for the purse:
1st of all you need to measure the height of the purse you need and cut the plastic thread 3 times longer than the height of the purse. String 3 beads into that thread set them on the center of the thread. Now, string 1 bead on both sides of the thread. The thread is divided into 2 sections; at this moment, thread 1 bead on each side and repeat the previous step of threading 3rd bead from both ends of the thread. Do it again until you reach the required length; once the required length is reached, thread the last few beads to lock the beads on the thread.
Make as many beaded chains as you need to complete the purse. Place these beaded chains side by side horizontally to attain the required width of the purse. I used 8 crystal chains of wholesale beads to complete my purse. Be careful that all the beaded chains are of the same length.
Join the beaded chains to make purse:
Again take a string of plastic thread 3 times longer than the height of the purse and thread a single crystal thread into it, place it in the center of the thread. Now place 2 crystal beaded chains parallel to each other and insert the string into the beads of each of these two chains and keeping the already threaded bead in the center. Thread another bead from both ends of the thread after threading the beaded chains side by side. Repeat the process again and again to reach the other end. At this point, thread wholesale beads randomly to lock them.
Join all the chains using the same techniques. Join the sides of the beaded chains to make the body of the purse. Fold the beaded mat into equal halves. The same technique will be used to join these chains too.
For making the interior of the purse:
Cut the piece of lining fabric for the interior same in size to the purse. Fold the interior piece into half and attach zipper of matching color. Sew the sides and turn the side of the fabric out.

Attach the exterior beaded purse to the interior and stitch it using needle and thread. Gibe the final touches by cutting the edges of threads and your beautiful purse made up of wholesale beads is ready to carry.