Crafting Wires

显示标签为“beaded chain necklace”的博文。显示所有博文

2016年7月12日星期二

Fashion 2-stand Chain Necklace with Heart beads

Hey, wanna make fashion beaded necklace at home? Here I will show a 2-strand necklace with heart turquoise beads and glass beads to you guys, hope you will like it.
Supplies you’ll need in making the heart beaded necklace:
15x10mm Clear Drop Glass Beads
Heart Synthetic Turquoise Beads
Chips Synthetic Turquoise Beads
8x6mm Clear Glass Beads
Golden Cross Chains
Golden Twist Chains
Headpins
Jump Rings
Lobster Claw Clasp
Round Nose Pliers
Chain Nose Pliers
Step 1: Prepare many heart turquoise beads, clear glass beads, drop glass beads and headpins, slide each bead to each head pin respectively and make a small loop at the other end of the head pins.
Step 2: Cut a piece of golden twist chain, and attach all the bead patterns to the chain as pictured.
Step 3: Prepare many clear glass beads, chip turquoise beads and headpins, thread each bead to each headpin respectively.
Step 4: Cut a piece of golden cross chain, and attach all the bead patterns to the chain alternatively as pictured.
Step 5: Cut other 2 pieces of cross chains, attach the beads cross chain and the beaded twist chain to one end of the cross chain through jump rings and put the twist chain under the cross chain.
Step 5: Attach 2 jump rings and 2 lobster claw clasp to the other end of the chains.
Done!
Now this chain beaded necklace is finished. The materials and tool in making such a chain necklace with beads are really common to see and they can be found easily on our web, so if you also like the heart beaded necklace, just try to make one yourself now~

2016年4月30日星期六

Easy method to make beaded jewelry with seed beads


Seed beads are small and are often used to ornament different beading plan. They are made from all kinds of materials and the mainly widely recognized material for them is glass. Glass seed beads are used in numerous different ways. They are used in among large beads in making diverse beading designs; they are also could be used as spacers after a crease and before insert the major bead. 

Most frequently, they are used to finish a fashion accessory or use it as an end bead. Additional method that use seed beads is often stringing them to form a numerous strand beaded fashion accessory and in peyote stitching by the use of five to seven thread to form a bulk necklace or bangle. You'll find that these pieces of art are most usually made from manipulate glass which is wound to form little beads. They are heated to a point that the bead makers are capable to mold them into little drops of glass. 


The Requirements For The Jewelry

Jewelry Supplies for beads will require: Seed beads, Beading floss a long, slim beading needle; Scissors; Charms of some sort; a variety of medium and large sized beads, which could be made of wood, glass, or plastic; wonderful glue; Jewelry clasps, & you can purchase these jewelry materials online.
One thread beaded bracelet. Charms and better jewelry beads can be added as well to make a pattern. A model can also be formed with using only seed beads too. No clasp is desired if not desired; it can be made big enough to slide over the wrist. Rings are easy to create and tons of them can be made rapidly. They can be made out of the entire seed beads or a larger bead can be added to the center of the ring.

Thread of large beads is attractive as well. These can be made into jewels or charms too and can be added to seed bead thread. Clasps which are one type of jewelry conclusion for jewelry making can be added to easy anklets, bracelets, jewels and chokers also this creates the adaptability to make the jewelry any size preferred.


Buying Glass Seed Beads

When looking to purchase these stunning objects, it is significant to choose unbiased colored or solid colored groups of these huge works of art. This way, they can be used in nearly all types of intend projects. There are diverse glass seed beads according to their shape and the best thing is they can all be used to improve a design.


2016年3月21日星期一

A simple guide to jewelry findings

I have been talking about certain terms that you as a beginner would be confused about. If you haven’t done a little research and are still wondering what jewelry findings are and why are they even used? Well, if you have come across to my blog posts before then you must have noticed that there are certain objects repeating in nearly every project.
Today, you will find answers to your questions regarding them. Let me present you with a basic guide. The term “jewelry findings” stands of jewelry making materials that are not referred to as beads, wires, stones and etc. They are the pivots and fundamentals of any jewelry, and are basically the tools you work with. Some of the names include eye pins, jump rings, bails, chandeliers, ear wires and etc.

Historically, jewelers made everything out of their hands. They would find these findings from abandoned metal and then left them over. They were eventually named by them as findings.
So now, let us have a broad outlook into some of the most common jewelry findings:

Jump ring: It is applied as a connector. They are round shaped usually but you can come across to oval shape as well. The two kinds of jump rings are closed & open rings. Closed are shut all through, so that they are not opened by anyone. They are useful when you need to join a strong connector for a jewelry piece that’s heavy or worthy. Whereas the open rings, they have an opening in between and are vertically pulled by pliers to open or close them.
Chandelier:  A chandelier is usually brought into use as earring connectors. With them, you can make dangle earrings by simply putting beads or chain to the holes. You also have to fix an ear wire atop the hole that connects.
Ear wire: As mentioned above, they are the key element in making earrings. It goes through your pierced ear holes. To the hole connecting it, you have to add components like metal works, buttons or beads to make different styles.
Eye & head pins: These jewelry findings are usually incorporated with beads to form workings for bracelets, earrings, necklaces and etc. Take a headpin, slide several beads and use cutters and pliers to form a loop that would take you to join it to one more component that is the ear wire. The head pin anatomy is usually round or flat and works as bead stopper. Eye pins on the other hand, have a link that work as a connector. You can make longer jewelry pieces therefore..
Bails: Bails are used for fixing a component such as a focal bead to a chain to form a pendant. Through a bail, you can easily fix a pendant to your chain without any third party material, such as metal-smith.
That’s it! I hope my guide to jewelry findings proved informative and considerable for you in terms of deciding what you need and how to use. Keep reading more posts!
  

2016年1月17日星期日

Making an Easy Handmade Beaded Chain Necklace

Do you love beaded chain necklace? Today, I will show you an easy handmade necklace tutorial, and you can also make one at home. Then follow me to have a look.

Jewelry making supplies you will need in making the pearl beaded necklace:
10mm Blue Glass Bead
12x8mm Blue Faceted Drop Bead
Headpins
Eye pins 
Jump Rings
8x6x1mm Silver Chain
Lobster Clasp
Round Nose Plier
Needle Nose Plier
Diagonal Plier


Step 1: Thread an 8mm pearl bead to an eye pin and make a loop at the other end of the eye pin. Repeat this step to make more such patterns. Thread a 10mm blue glass bead to an eye pin, make a loop on the other end and repeat to make more such patterns.
Step 2: Connect a pearl bead pattern with a glass bead pattern, repeat this step to make another such pattern, link these 2 patterns with a jump ring, and add an 8mm pearl bead pattern on the two sides as pictured. 
Step 3: Snick off 2 pieces of chains (with a length about 16cm), link them to the beads pattern as pictured. Attach a pearl bead and a glass bead pattern on the two sides of the beaded pattern as pictured.
Step 4: Link 4 glass bead pattern together and connect them with the jump ring as shown in the picture, add a jump ring on this glass bead pattern and link a pearl bead and a blue faceted drop bead pattern on the below.
Step 5: Add 3 pearl bead patterns on both 2 sides of beaded drop. Snick off 2 pieces short chain (with a length about 10cm), connect these 2 short chains on both sides of the silver bead chain necklace as pictured.


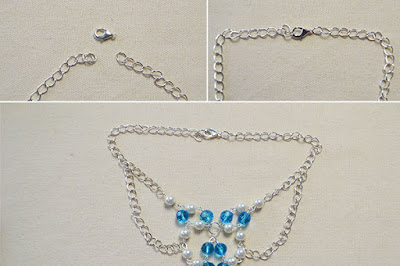
Step 6: Connect the necklace with a lobster clasp.
Done!
Now, this DIY chain necklace is finished. With blue glass beads and white peal beads, this beaded chain necklace becomes more attractive, right? If you also love the silver bead chain necklace, just try to make one for yourself.