Crafting Wires

2015年7月28日星期二

Seed Bead Jewelry & Crafts Must See


Hey my dear readers! I'm always here to inspire you and to embellish your day. For today I have a great collection of seed bead jewelry and crafts that will leave you breathless. Are you excited? As we all know that seed beads are very little and lightweight beads, which can be decorated with all kinds of crafts and jewelry. I love to make crafts with seed beads, especial accessories. Do you? You should not spend much money on jewelry, because there are enough seed bead jewelry ideas in this post that will inspire you to DIY.

Although the size of seed beads is very small, it is grand and bright stringing strands. These beads are popular used for making jewelry or home decoration. There will be endless possibility with these beads. Even you can combine a lot of seed beads into a beautiful bead, which can be so creative. Right?

Now you can enjoy the jewelry and crafts I shared below. If you love one or all of them, try your best to handmade your own one. All these crafts are mainly used seed beads which are quick to loom and easy to string or sew. They will provide you with an extensive alternative to conventional seed bead sizes. 

Check out the gallery and inspire yourself! Pick the jewelry that you like the most and surprise your friend, mother or daughter with a gift like this. Enjoy and have fun!


2015年7月27日星期一

How to Make Simple Beaded Chain Necklace in 10 Minutes

It is believed that most women can’t resist the temptation of necklace, especially beaded necklace due to their simple while vogue designs. If you are considering preparing a gift for your girlfriend, then you may try this stylish DIY beaded necklace.Check the beaded necklace tutorial now and let’s see how to finish it in 10 minutes! 
Jewelry making supplies for the beaded chain necklace:

10-12 inches of chain, cut into two pieces
About 5 inches of beading string 6-10 beads
2 crimps 4 jump rings
1 bracelet clasp
2 pairs of flat nose pliers
1 pair of wire cutters

Look at the above picture, at first take a crimp bead and slide it on one end of your beading wire and retain 2 extra inches.
Loop the end of the wire back into the bead to create a tiny loop. And secure the crimp bead with your pliers.
Then slide the beads in order as you like. When finishing sliding beads, grab the second crimp bead and repeat the first step. Make sure you get your crimp bead closed to your beads so that they could stay tight. Next loop your extra beading wire in through 3 or 4 beads before and open 2 jump rings and hook them to the loop of the beading wire separately.
At last attach the last jump rings and attach one to the end of the chain to attach your clasp. And don’t forget the other side.

Super easy to follow, right? Time to send it to your girlfriend! You can use other beads as you like, and I’m sure your girlfriend will love it and appreciate that you took the time to make this beaded necklace for her.
(Tutorial source: Stranger than vintage)

2015年7月24日星期五

Taking Care of your Snap Jewelry

Just like any other decorative materials you have in your house, snap jewelry should be taken good care of in making sure they serve you for longer periods. Such jewelry comes with high quality and ruining them will be the last thing to do. You must put in all the effort in making sure your jewelry is safe and secure against any damaging effects. It will range from how you use your snap jewelry to how you store them. This is a guideline on how to take care of such jewelry and you need to consider the following points:

  • When storing, make sure your jewelry has been kept in a safe place away from the reach of children and anything that might cause harm. The place you store them should be dry and with the right environment. You can have them placed in sealed boxes for assured safety.
  • During purchase, there were manuals you received alongside snap jewelry which you should not ignore. They have vital information on how you should take care of your jewelry. Stick to whatever the manufacturer has recommended because he or she is the one who knows how they were manufactured.
  • When you are carrying your jewelry out but you are not using them, they should remain in the pouches. That is the ideal storage space while out of the house and it will ensure they don’t get lost or damaged easily.
  • Cleaning of your snap jewelry is very important but you should have a good plan for doing that. Regular cleaning will not be advisable to cushion them against fading out very fast.  You can do the cleaning at least once in a month with regular wiping out of dirt within that period. You should only clean your jewelry when they are dirty and not just for fun.

  • There are specific types of cleaners that are recommended for cleaning snap jewelry and they should be used all the time. The reason for using the specified cleaners is because some are reactive to the jewelry material which can damage your precious jewelry. If you are using any cleaner that is not recommended by the manufacturer, it will be good that you seek prior guidance. You should not do something that you are ignorant about.
  • General handling of snap jewelry is another important thing to know as far as their care is concerned. Some people don’t know how to handle such fragile materials thus end up breaking and damaging them. You should place your jewelry down gently and avoid throwing them away carelessly. Always put them on patiently without being on the rush and the same should apply when you are removing.

Once you are in a position of adhering to all that without fail, you will get to enjoy longevity with your snap jewelry. Good care will assure them of durability but carelessness will mean you make regular trips to the market for new purchases. The choice is yours to make on how best to take care of your jewelry. 

2015年7月21日星期二

Awesome DIY Charm bracelets Made by Masdy

Hello, my dear readers, instead of sharing tutorials, today I want to introduce an excellent designer to you, Masdy, who loves to make DIY charm bracelets so much. Hah, most of the below are charm bracelets for girls, except the first one, which looks like a little more for man. Do check out these fabulous charm bracelet DIYs and hope you’ll love them!
It is believed that black and white are never out of date as well as vintage style. In the first bracelet,Masdy combined black and silver white artfully, it looks full of vogue with lobster claw clasp.

In the second one she used handmade woven beads, it looks like a bracelet hangling with colorful candies. And such kind of woven beads is can be made at home, if your interested, go google it for a try. Or just head to online bead stores for purchase directly.

The third one is not conventional charm bracelet as we always see.
She used tibetan style pendant and combined two bead strands and a chunky chain twisted together, which makes it so stylish and unique.

The fourth one is made by nylon, and the pendants she used always remind me of pirates of the Caribbean. 

The last one is the normal colorful rainbow bracelet with brass pendant, alloy crystal rhinestone. Bright-colored bracelets are always adored by children and girls, especially with such cute charms.


After appreciating those 5 charm bracelets, which bracelet with charm is your favorite? Of course, apart from what we have seen above, there are far more different DIY charm bracelets which are various in colors and designs. If you want to know more and make one, go for learning center and prepare jewelry making supplies, You can make your customized charm bracelet as you like. 

2015年7月16日星期四

How to Make Lovely Girls Hair Accessories

Hello guys, last time we talked about DIY rings, today I will tell something that most girls will like, DIY hair accessories. As one of the most popular girls hair accessories, wire hair accessories become protagonist of today’s tutorial. Now follow me, have a nice try!

Aluminum wire
0.3mm copper wire
6mm 
wood beads

Wire cutting plier
Round nose plier


Let’s look at the picture, step by step finish the girls hair accessories.
First trim off a length of 15cm aluminum wire and twine it to a hoop shape, use round nose plier to twine some circles on both ends.

Then prepare 0.3mm copper wire to twine ten times closed to the circle, and slide a wood bead. Repeat the above steps, twine ten circles, stop until 14 rainbow wood beads have been used up.

At last, trim off another 10cm aluminum wire and loop on one end, slide a wood bead to an 8cm copper wire and add the bead to the loop by twine some circles on the loop.


Tata, your DIY hair accessories is perfectly done. So easy, right? You could use other beads to decorate your hair accessories as you like. Just do it, I’m sure you will have a funny and happy time in creating it!

2015年7月15日星期三

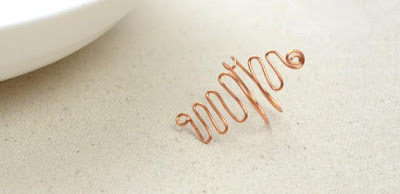
How to Make a Copper Wire Ring in Five Minutes

Nowadays people are fond of wearing various rings to make them more eye-catching. As one of the most popular rings,copper wire rings are ubiquitous because of their simple but vogue designs. Do you want to make a DIY simple wire ring? Here is a copper wire ring tutorial, have a nice try!  


jewelry making supplies for copper wire ring:
Cylindrical stick
Pliers


Instructions on making a copper wire ring:


Hey, let’s look at the picture, step by step to finish this copper wire ring.
At first, we need to prepare a proper length of the copper wire and make a loop with plier in case that the sharp location will scratch your skin or something else;
Second, use the round nose plier to make several curls as the picture shows, and grab a cylindrical stick which has similar circumference to your finger, use the wire to wrap another circular pattern;
Thitd, repeat the above process for more zigzags, and make other loop at the end of the wire.


Congratulations, your copper wire ring is well done! So easy, right? You can brainstorm more patterns you like, and create more various copper wire rings. I’m sure you will enjoy it. 

2015年7月13日星期一

Tips for Organizing your Jewelry Making Supplies

You should always have your jewelry making supplies well organized all the time you are using them. Good organization will make sure you can get the thing you want at convenience and working space will not be messy. Some people are much disorganized in life that it’s difficult putting their act together in jewelry making. As a person, you should strive to get that right for your supplies. If you are not organized, you will realize too late that something is missing or you will use the right supply at the wrong time and for the wrong reason.


Thus, it’s paramount to get organized when using jewelry making supplies. The following are some important tips to help you get organized:
There is need to have some baskets at hand and preferably those with handles are the best choice. You can have a basket each for carrying and storing your pliers, wires and beads or any other supplies.
Ensure your beads are sorted out well. Doing that will be time consuming but it’s very important in making sure your jewelry making supplies are in order. The time taken in sorting the beads will not be more than the convenience you will enjoy when picking out the specific beads to work with when such need arises. You can sort them as per their colors, shapes and sizes or even material.
Pliers can cause injuries when mishandled so make sure the cutting parts are covered to avoid such injuries. You can use a rubber band to secure the covering more especially when you have playful children around.
When you have any cuttings from the wire or any form of trash, you should make it a priority trashing them away. These are simple things that can end up making your working space messy and interfere with your jewelry making experience. Always make sure your working space is well organized by clearing all the trash on time.
Before starting to make any jewelry material, be sure that all the jewelry making supplies are in place. Do a roll call of the items you are expecting to use to make certain that they are available and in their right quantities.

Sometimes, people take good organization for granted and only get to realize how important it is after messing up. You should never use your working space for any other job apart from jewelry making. Do not pretend that you can multitask when handling jewelry making supplies since you will end up in big mess. When you mix up things at your working space, you will compromise on your jewelry making process which will not deliver positive results.

When using pliers and other cutting tools, you must be very careful not to cut yourself or another person offering assistance. Injuries from such tools will take long to heal so you don’t have to be careless on that. Being extra careful will be something to give priority when dealing with jewelry making supplies. Next time you have such supplies to handle; these tips will help instill good organization.

Important Information about Seed Beads


Have you ever used seed beads in your life? If not, you must have been missing a lot and it’s time to discover that. When you are getting started, it should not be problematic once you have some basic information at your fingertips. That is what this article will discuss to make you informed. You can make the right choices about seed beads whenever you have needs to satisfy.

Whether you are an experienced buyer or you are just a beginner, use these tips to help you out and avoid frustrations. Make sure you have not overlooked anything regardless of whether it’s a major or minor thing.

  • Classification- seed beads can be classified as per their country of origin. To some people, that is odd but that’s the reality and you should consider that when making purchase. You will always get it easy choosing these beads in the market by looking at the country where they were made in. Japanese beads come with high quality while their size is uniform, Czech beads are typically rounded but that is not consistent while Indian and Chinese beads are other applicable choices. Make sure you choose the right beads from a country of your choice.
  • Uses- don’t limit yourself on the ways you can use seed beads since there are limitless uses. You can use the beads in embellish clothing and that is made suitable by their small sizes. You can use them with jeans, tops and skirts among other apparel. Embellish accessories are other ways to use these beads because of the many colors they come with. You can match that with many other accessories. If you are into crafting, using these beads will be a good option since you will have the freedom to work on a wide variety of things.
  • Selection- when looking for the right type of seed beads to buy, your choices will be many thanks to wide selection. You can choose beads as per their size, color, shape and material just to suit your needs. There will be many options available for your due consideration in the market. When selecting, you should compare all that the market offers before settling on the best one.

Touching specifically on the purchase of these beads, you will have to choose between buying online or from a physical shop. Both are good for consideration but online purchase comes with more merits than offline purchase. When you choose to buy seed beads online, you will enjoy among other benefits convenience, reliability and flexibility. That is what you will be looking forward to enjoying once in the market.


First-time buyers of beads online go through tough experiences that you must be wary of. This is because you will come across very many stores that are operated by criminals and does not offer the right type of beads you are looking for. It will be good if you do some research over the internet prior to embarking on the purchase. It will give you a good starting point. 

2015年7月9日星期四

Advantages of purchasing wholesale buttons online


Wholesale buttons are amongst the most popular items purchased by designers. Buttons are often overlooked, but how do you think your favorite shirt or blouse would look without them? It goes without saying that buttons are the most popular fasteners around. These days they are even used in place of zippers and you will even find them as fasteners on bags. Hence, any designer, crafts person or jewelry designer will surely benefit from having lots of buttons at hand.

One thing that designers, craftspeople, and jewelry makers are always on the lookout for are cheap prices. This is because all handicraft people work hard to reduce the cost of making goods to increase their profit margins. Hence, when it comes to purchasing items like wholesale buttons, people look at the most affordable prices. Also, they also look for good quality, and where possible ease of delivery as concerns the purchased buttons. Online shopping outlets provide all these advantages.


The best place to purchase buttons on wholesale is definitely online. Now that internet access is so widespread there is no excuse for lacking crucial materials such as buttons in your workshop. There are so many advantages when it comes to purchasing buttons online. These are:

-    Ease of access

As long as you have internet access then supplies shops that sell wholesale buttons are a click of your mouse away. As long as you have a valid virtual wallet or a valid debit card you can purchase all the buttons and craft supplies that you need. You don’t have to leave the comfort of your home or your workshop to do so. This is an ideal shopping outlet for busy people, stay at home moms, and business people that work from home.

-    Variety

While brick and mortar shops are good, they often don’t have the wide selection of supplies that online supplies shops have. Online shops will have a wide variety of buttons to choose from that you will not find at your brick and mortar supplies shop. Also, these online shops are often stocked with the latest button designs that you will not find at local shops still stuck waiting to clear old stock.

-    Discounts and sales

Online shops often have sales on wholesale buttons. Since they can sell their buttons on wholesale, they have a lot of leeway to offer attractive prices, discounts and even stage amazing sales. They make offers that you will never see at your local shop. When you combine the attractive prices they offer to the great selection of buttons they have on offer- you can’t help but spend your money on their buttons.


Online shopping for wholesale buttons is the in thing. There is so much you can do with buttons. You can use them on beautiful clothes and create beautiful accessories such as hair bands and jewelry. You can also use buttons on house decor items such as pillows and lamp shades. So why not purchase your buttons on wholesale today!

2015年7月6日星期一

How to Make Lovely Kids Bracelets?

Summer vacation is coming, want to make your kids dazzling when they go out with friends? What about making a beaded bracelet for kids?Read the following tutorial and have a nice try!

jewelry making supplies for the kids beaded bracelets: 
Glass Beads Strands
Glass Seed Beads
Glass Bugle Beads
Iron Jump Rings
Iron Bead Tips
Tiger Wires
Bracelet clasps - lobster clasp
DIY Jewelry Tool Sets
Needle Nose Pliers
Round Nose Pliers

Step 1: Make a basic strand
First, prepare a tiger wire and add an iron bead tip on the one side;
Second, slide 2 green glass beads and a glass bugle bead on the tiger wire;

Third, continue sliding beads just like the second step, and you can think about a proper length according to your kids’ wrist;
Fourth, add an iron bead tip on the other side.

Step 2: Add another bead strand on the basic strand
First, slide another proper length of tiger wire across the iron bead tip and the first two green glass beads, then string 5 seed beads, a green glass bead and another 5 seeds beads on the tiger wire;
Second, slide the tiger wire across the following 2 green glass beads, then repeat the steps bellow.

Step 3: Finish the rest of kids beaded bracelets
Continue the steps I showed before. When finishing the main part of the bracelet, then add 2 jump rings to the two ends and add a lobster clasp to the jump rings.


Congratulations, you have finished the lovely kids beaded bracelets! As a gift for your kids, it will surprise them and make them eye-catching. A DIY bracelet for kids is far more lovely and sincere than you buy one at the shopping mall, right? I bet your children will be thrilled at this amazing kids beaded bracelet.

2015年7月3日星期五

Mickey Mouse Necklace DIY!!!

Simple jewelry can sometimes be made without too difficult steps and complex materials. I have a T shirt with a Mickey's pattern, so I decided to make a piece of necklace in Mickey's pattern too. I couldn't just resist it because it is so cute!! Before I start to share this tutorial, there is one thing must be made clear at first, do you LOVE mickey mouse? Do you want to make one? Ahaha... okay, let's begin!

Materials and tools you will need:
Silvery iron chain
Eye clasp
Cerise Opaque acrylic beads
Acrylic spike beads
Eye pins
Jump rings
Round nose plier
Flat nose plier
Wire cutter

1. Make the Mickey Mouse Pendant
1). Make two bead links by 10mm pink acrylic beads and five bead links by 6mm pink acrylic beads with eye pins. Then make one bead link by a big flat pink acrylic bead.
2). Attach five spike beads to the five small bead links as the picture shows. Then attach the five bead chains to eye clasp.
3). Attach the flat round bead link to the eye clasp.

2. Finish the handmade Mickey necklace
1). Prepare a 40cm length of iron chain, and then attach the 2 10mm acrylic bead links to both ends of the chain.
2). Attach these 2 bead links to the Mickey pendant.

That's it! Using lightweight beads this necklace is very light and delicate, lovely for summer with a Mickey Mouse T shirt. I enjoyed making cute jewelry so much and am so happy with the result that came out. And you?