Crafting Wires

2016年3月28日星期一

DIY Simple Silver Chain Bracelet with Pearl Beads

If you are searching for beading bracelet DIY, then you can look here. Next I will share a pearl beads bracelet with you all, and I hope you can get some useful information from this simple chain bracelet. Then, just let’s begin~
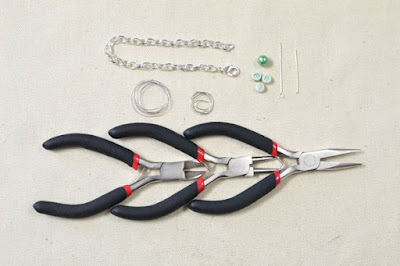
Jewelry making supplies you will need in making the pearl beaded bracelet:
8mm Green Pearl Beads
Alphabet Acrylic Beads
Jewelry Wire
Silver Cross Chain
Headpins
Eye Pins
Round Nose Plier
Long Nose Plier
Side Cutting Plier
Step 1: Slide 3 green pearl beads to an eye pin, making a small loop at the other end of the eye pin. Cut a long piece of jewelry wire, wrapping the wire around the 3 beads several times as pictured.
Step 2: Cut a piece of cross chain, attach the pearl beads pattern in the middle part of the chain and add a lobster clasp at one end of the chain. Slide a pearl bead to a headpin and attach it to the other end of the chain.
Step 3: Slide 3 letter beads to 3 headpins respectively, you can choose the beads according to yourself, and here I choose the “P, E A”. Make a loop at each end of the headpins and connect them with the chain.
Done~
Now, this silver bracelet with pearl is finished, love it? Such a beading bracelet is quite easy to make for both jewelry making professionals and green hands, and you can DIY this pearl beads bracelet yourself at home as well. Anyway, have a nice day! 

2016年3月25日星期五

Glass beads project: How to Make Earrings of Lampwork Beads?

Hello friends! Today, I present you an exciting tutorial of crafty lampwork beads that are so dear to us. It is indeed a pleasure in making handcrafted jewelry and now we are getting ahead with subtle designs and other combinations of jewelry.
It is a pretty easy project to pursue if you are a beginner. I would say, spare about 30 minutes of your time and approximately $20 from your pocket money. You will need to collect some supplies and cost of each varies from store-to-store.

Following are the materials you require to handcraft your beautiful earrings:
·         *Lampwork beads – 2x, round in shape, medium size, red colored
·         *Earring components – 2x, leverbacks, posts or French hooks
·         Sterling silver or 14 Carat Gold wrapping wire
·         Headpins – 2x
·         Daisy spacer beads – 2x
·         Nylon-jaw pliers
·         Round-nose pliers
·         Flat-nose pliers
*I personally like red lampwork beads, so I mentioned them to use here. You can also choose gold or silver if you like.
*Leverbacks are generally practical with longer or heavier jewelry designs. If you prefer French hooks then fix a rubber stopper to them in order to prevent them from sliding down. You know the drill!
Start by creating the frame with lampwork beads: grab a headpin and string your beads and one daisy spacer. Followed by, form a basic type of loop.
Now, take your gold or sterling silver wire and work about 6” of its length. Use your nylon-jaw pliers to straighten the bent shape of your wire. Do it gradually and neatly; you do not want your wire to deform or break into pieces. Wires are delicate, do remember.
Then, about one end of your wire, form a loop and fix one bead into this loop. Work with your round-nose pliers, carefully form a squiggly design of your wire by bending it back and forth neatly – it should be fun.
The length of this squiggle depends on your preference; make few squiggles for a short length or many for a longer length. As a general recommendation, I say you keep your wiggles about an inch long.
Use your flat-nose pliers and bend your wire on the opposite ends about a right-angle shape. Create another loop as you did of the other end of your wire. You can choose to stern your wire slightly by squeezing your squiggled wire component neatly and gently using your nylon-jaw pliers, but this is not a hard-and-fast rule. Repeat the same squiggling and forming loop for your other piece of earrings.
Now fix this finished piece to your earring component that you choose with the help of flat-nose pliers. Your earrings are ready!
That was surely it. You must be pleased how simple and comprehensive every detail was about each step. I understand certain processes require practice, but who said you could be an expert on your first attempt? No one ever!

These lampwork beads earrings are a splendor to wear; fun and amusing for others to spot. Stay tuned for more exciting jewelry tutorials.

2016年3月21日星期一

DIY Pearl Beaded Leaf Hair Clips

Love pearl hair clips? Today’s tutorial on making beaded clips deserves your attention to look, and you may need such a beaded hair accessory. So, just follow me to know HOW!

Supplies you will need in making the beaded hair clips:
6mm Half Round Pearl Acrylic Cabochons
8mm Half Round Pearl Acrylic Cabochons
4mm White and Pink Pearl AcrylicBeads
25x18x5mm Clear Flat Faceted Drop Acrylic Rhinestone Cabochon
15x15x8mm Pink Plastic Flower Beads
Rhinestone Cup Chain Brass Chains
Hair Clip Finding
0.5mm Jewelry Wire
2mm Aluminum Wire
Side Cutting Pliers
Chain-Nose Pliers
Glue Gun
Step 1: Cut a piece of aluminum wire and make it into a leaf shape. Cut a long piece of jewelry wire, wrapping it around the leaf shape. Cut another piece of jewelry wire, and continue to wrap it around the leaf shape.
Step 2: Stick enough acrylic pearl beads in different sizes along the leaf shape as pictured. Add a flower bead, a clear rhinestone cabochon and a circle of acrylic rhinestone beads on the leaf, and add then add more white and pink pearl acrylic beads in different sizes, a flower bead on the leaf as pictured.
Step 3: Stick a hair clip finding on back of the bead leaf pattern.
Done~
The leaf hair accessory is finished now, so beautiful and elegant, yes? You can follow my detailed steps to make the beads clips for your mother, and I think she will love it really. Just have fun~


A simple guide to jewelry findings

I have been talking about certain terms that you as a beginner would be confused about. If you haven’t done a little research and are still wondering what jewelry findings are and why are they even used? Well, if you have come across to my blog posts before then you must have noticed that there are certain objects repeating in nearly every project.
Today, you will find answers to your questions regarding them. Let me present you with a basic guide. The term “jewelry findings” stands of jewelry making materials that are not referred to as beads, wires, stones and etc. They are the pivots and fundamentals of any jewelry, and are basically the tools you work with. Some of the names include eye pins, jump rings, bails, chandeliers, ear wires and etc.

Historically, jewelers made everything out of their hands. They would find these findings from abandoned metal and then left them over. They were eventually named by them as findings.
So now, let us have a broad outlook into some of the most common jewelry findings:

Jump ring: It is applied as a connector. They are round shaped usually but you can come across to oval shape as well. The two kinds of jump rings are closed & open rings. Closed are shut all through, so that they are not opened by anyone. They are useful when you need to join a strong connector for a jewelry piece that’s heavy or worthy. Whereas the open rings, they have an opening in between and are vertically pulled by pliers to open or close them.
Chandelier:  A chandelier is usually brought into use as earring connectors. With them, you can make dangle earrings by simply putting beads or chain to the holes. You also have to fix an ear wire atop the hole that connects.
Ear wire: As mentioned above, they are the key element in making earrings. It goes through your pierced ear holes. To the hole connecting it, you have to add components like metal works, buttons or beads to make different styles.
Eye & head pins: These jewelry findings are usually incorporated with beads to form workings for bracelets, earrings, necklaces and etc. Take a headpin, slide several beads and use cutters and pliers to form a loop that would take you to join it to one more component that is the ear wire. The head pin anatomy is usually round or flat and works as bead stopper. Eye pins on the other hand, have a link that work as a connector. You can make longer jewelry pieces therefore..
Bails: Bails are used for fixing a component such as a focal bead to a chain to form a pendant. Through a bail, you can easily fix a pendant to your chain without any third party material, such as metal-smith.
That’s it! I hope my guide to jewelry findings proved informative and considerable for you in terms of deciding what you need and how to use. Keep reading more posts!
  

2016年3月13日星期日

DIY a Pair of Handmade Beaded Drop Earrings with White and Black Glass Beads

Hey, are you interested in glass bead earrings? Glass beads are always shining and sparkling, so that jewelry making lovers are willing to use them in jewelry making. Today, I am gonna bring you a pair of drop bead earrings which is made by white and black glass drop earrings and jewelry. Maybe you will like it. Then, let’s have a look~
Jewelry making supplies in making the handmade beads earrings:
12x8mm Black Drop Glass Beads 
15x10mm Clear Drop Glass Beads
4mm Golden Round Beads
0.3mm Jewelry Wire
0.3mm Golden Earring Hooks
Needle Nose Plier
Stainless-Steel Scissor
Step 1: Snick off a piece of 0.3mm jewelry wire, slide a 15x10mm clear drop glass bead on middle of the wire, and wrap the 2 wires together to fix this beads. Snick o piece of 0.3mm jewelry wire again, slide a 12x8mm black drop glass bead on the wire and fix the bead as pictured.
Step 2: Add a black bead on one the left side of the clear bead. Continue to add 4 15x10mm clear beads and 2 12x8mm black beads on the wires as pictured. Twist the 2 wires together and slide a 12x8mm black bead on the wires, and fix the bead by twist the 2 wires several times.
Step 3: Slide a 4mm gold round bead on the 2 wires, making a small loop with the wires and cut off the excess wires.
Step 4: Attach the bead drop to an earring hook.
Done~
Now, this pair of white and black earrings is finished. It is really easy to make, then do you want to make such beaded drop earrings? Just have a nice try and have a nice day!

2016年3月10日星期四

How to make a bracelet using lampwork beads?

Hi friends! I am back with another crafty tutorial this time, using our dearly tendered glass beads. I generally recommend using lampwork beads because they simply are more attractive than any (in my opinion). So, let us stop talking now and begin!
First of all, make sure you check listed all the supplies mentioned below:
·         Lampwork beads

·         Beadalon wire – 19 strand
·         Toggle clasp
·         Jump rings – 2x, 5 to 6mm
·         Calottes – 2x
·         Swarovski crystal beads (optional to use) – blue
·         Bali Spacer beads – (optional to use)
·         Crimp beads
·         Crimp pliers
·         Chain-nose pliers
·         Wire cutters

Step 1: Grab your cutter and cut out a wire piece around 1” longer than your bracelet’s actual length. Followed by, string a crimp bead onto the ending point of your wire. Compress your bead using crimp pliers. Then, slide your calotte onto your wire and reach the middle of your calotte with it. You do not need any parts sticking out, so trim away the wire part in excess on the side of your crimp bead.
Step 2: Followed by, close your calotte using your flat-nose pliers or your chain until it is absolutely closed.
Step 3: Afterwards, open your calotte’s loop using the chain-nose pliers and put a jump ring into it. Then, close it using chain-nose pliers again.
Step 4: Now, fix a jump ring by opening your calotte’s loop using the pliers. Open the jump ring and then put your toggle clasp’s bar. The same way as you opened the jump ring, close it.
Step 5: Time to string your lampwork beads! I would recommend you follow my order, but you are absolutely free to go for your own: Swarovski beads, lampwork beads, Swarovski beads again, bali beads, Swarovski beads again and finally lampwork.
Step 6: Get the desired size of your bracelet’s length. You need to keep in mind that your toggle clasp will have a jump ring & a calotte eventually. Insert your calotte once you have reached the perfect length and then the crimp bead. Do not open your calotte too much; relax and open it slowly. I come from an experience of breaking my calottes and then frustrating myself. I would strictly advise you not to use crimp pliers for this particular crimp bead because they will break. You can use bent-nose pliers or a chain. Put the wire in one hand of yours and then use your chain-nose pliers in order to compress your crimp bead.
Step 7: Trim the extension of your wire away using wire cutters. Now gently close the sidings of your calotte using flat-nose pliers or a chain.
Step 8: Followed by, open up the loop of your calotte and put the next jump ring. Now close the loop. In order to insert the ring of the clasp, open your jump ring. Close the jump ring now, and your lampwork beads bracelet is all done!

That is all! I hope you enjoyed this lampwork beads tutorial. Stay tuned for more guided tutorials on my blog.

2016年3月8日星期二

DIY Handmade Angel Pendant Necklace with Beads

Hey guys! Wanna make angel pendant necklaces? Angle pendants are always cute and noble, and today I will share a bead pendant necklace with you. Hope you can get some inspirations from this tutorial. Well, follow me to have a look now!
Sullies you will need in making the bead pendant necklace:
6mm White Faceted Abacus Glass Beads
6mm White Round Pearl Beads
4mm Yellow Round Pearl Beads
30x10mm White Drop Pearl Beads
18x7mm White Drop Pearl Beads
12mm Black Round Beads
Rhinestone Bar Spacer
Golden Bead Caps
0.3mm Jewelry Wire
Silver Jump Rings
Golden Headpins
Silver Twisted Chain
Silver Lobster Clasp
Stainless-Steel Scissor
Round Nose Plier 
Step 1: Snick off a piece of 0.3mm jewelry wire, thread 5 6mm white faceted glass beads and a 4mm yellow round pearl bead to it as pictured. Cross the end on the right side through a faceted glass bead bear the yellow pearl, and then thread 3 6mm white faceted glass beads and a 4mm yellow round pearl bead to this wire. Cross this wire through a white glass bead bear the yellow pearl. Cross this wire through the same white glass bead again and then thread an 18x7mm white drop pearl bead to this wire, then twist the 2 wires together as pictured.
Step 2: Slide a 30x10mm white drop pearl bead to a golden headpin, attach this bead to the ready bead pattern made in step 1. Reap step 1 to make other same bead pattern and then connect it on the other side of the drop pearl bead as pictured.

Step 3: Thread a rhinestone bar spacer onto the headpin, continue to add a 12mm black round bead, a golden bead cap and a 6mm white pearl bead onto the headpin, then make a small loop on the other end of the headpin.
Step 4: Cut a piece of silver chain, link the middle of the chain with the handmade angel, and connect the other 2 ends with silver lobster clasp and jump rings.

Done~
Wow, such vivid handmade angel jewelry is done! If you also like angel pendants, then you can follow this jewelry tutorial to make your own one. Hope you like it and have a nice day!

2016年3月4日星期五

How to make a hemp necklace using common jewelry making supplies?

Hello girls! I am back with another hand crafted jewelry tutorial. This time, we are going a bit conventional using hemp and the rest common jewelry making supplies.
You need to choose hemp twine. Now it comes in various colors, but I recommend you grab the old and natural color. The size can be 1mm, however, a bit broader can also be good. Try buying waxed hemp or simply wax your hemp on your own.
Keep check of the following jewelry making supplies:
·         Hemp twine
·         Beads
·         Beading board
·         Clasp & cord tips
·         Pliers
·         Safety pin

Step 1: Arrange your beads on your beading board. You can even sketch the flat and spiral weaves of parts. Cut 4 pieces of your hemp. Two will make a base and have to be a bit longer than the finished one will be. You will require the other two pieces to form knots, and they need to be just about 5-6 times longer than your finished one. The length depends on beads you add, especially their sizes because you will require less hemp for larger beads as you will tie lesser knots
Step 2: You can make use of a clasp or button to form a loop at each end of the piece. Cut two pieces: one for knots and the other for base. Make sure their length is 2 times longer than what you choose. Afterwards, fold the pieces over and form a loop.
Step 3: You need to knot the hemp just the way you thought in your design. Slide your bead on above the 2 foundational threads and followed by, tie the other knot underneath it – not too tight, or not very loose.
Step 4: Followed by, let ample hemp piece to braid the finishing points and tie them simultaneously. I believe this is a very simple manner to finish off. Then, you need to add a clasp. Think over it before doing it. Cut 2 pieces that are 2 times longer in lieu of cutting 4 pieces. Fold them in half and then make one end by tying one loop. Put a bigger bead or button at the opposite side. Your bead will hold on to it when you stick it into the loop.
Step 5: If you want to finish your hemp piece’s ends with wired or metal cord tips, then it is your choice to use a simple clasp. These will go above the ends of your hemp piece. These jewelry making supplies are of 2 types: one that has got metal flaps that twist over the cord and the next one that has a coil and the bottom part of which you crimp just about the cord. You can use jump rings to form a normal clasp.  
You are all done! It was that simple. Doesn’t it look splendid? I am sure you loved it and enjoyed all through crafting it. Stay tuned for more crafty tutorials using jewelry making supplies.